¶ How can an operator select a courier service in an order (Delivery block)
The Delivery block allows you to specify which courier service the orders will be unloaded through. You can choose this directly in the order card.
To send orders to courier services correctly, you need to make sure that you have done the following steps:
- you have added the logistics plugins you need (via SalesRender integrators)
- you trained call center employees to choose the right courier service when working with an order
- there are enough item in the warehouses selected as the base ones inside the logistics plugins
The delivery block displays all those logistics plugins that you have added. For example, you have enabled 3 logistics plugins: Russian Post, CDEK, and your own couriers.
For each logistics plugin, it is mandatory to select a warehouse from which unloading occurs, for example, you ship orders for 1 from a warehouse in Victoria, and orders for your own couriers - through a warehouse in Mumbai. Inside the delivery block in the order card, you will see tabs, depending on how many warehouses you have in general that are unloading to courier services.
At the screenshot below you can see warehouses Victoria and Mumbai. Let's go to the Mumbai warehouse tab and see the Russian Post plugin attached to it.
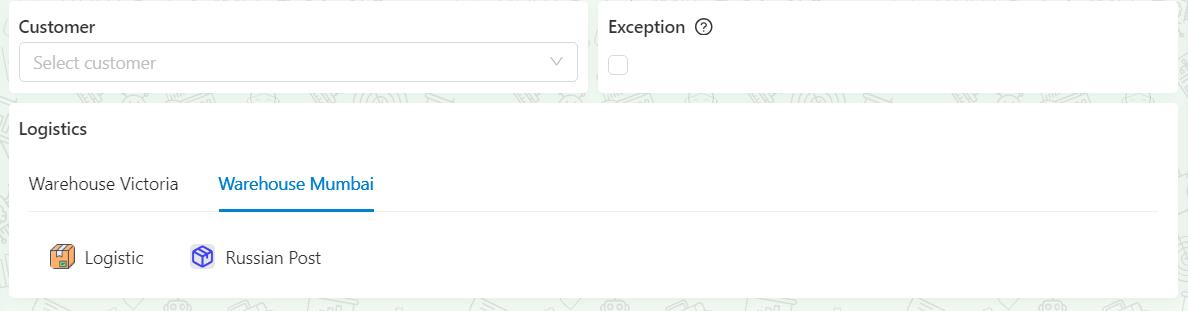
When you click on “Logistic” tab, the creation of an invoice will open. The invoice is needed to export orders to the personal account of the postal service or to track the parcel by track number.
In the invoice of the Russian Post only one field is available for filling - the track number.
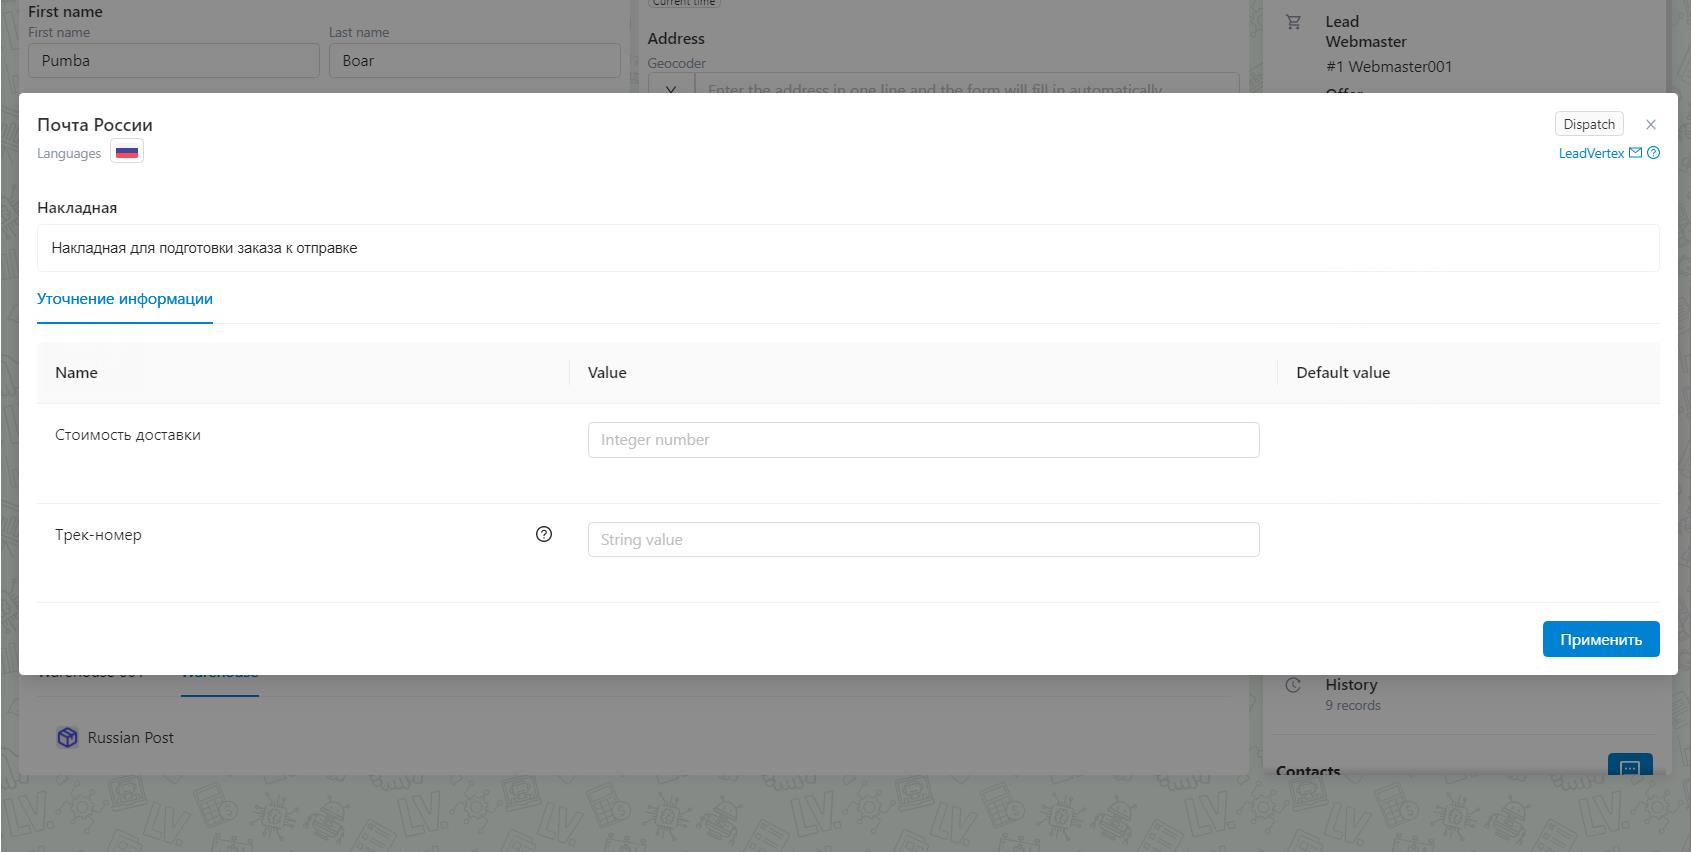
The field with the track number needs to be filled in if only the order has already been unloaded and you need to track its movement. If the order has not been uploaded yet, then you need to left the field empty and click "apply".
¶ How to export (send) orders
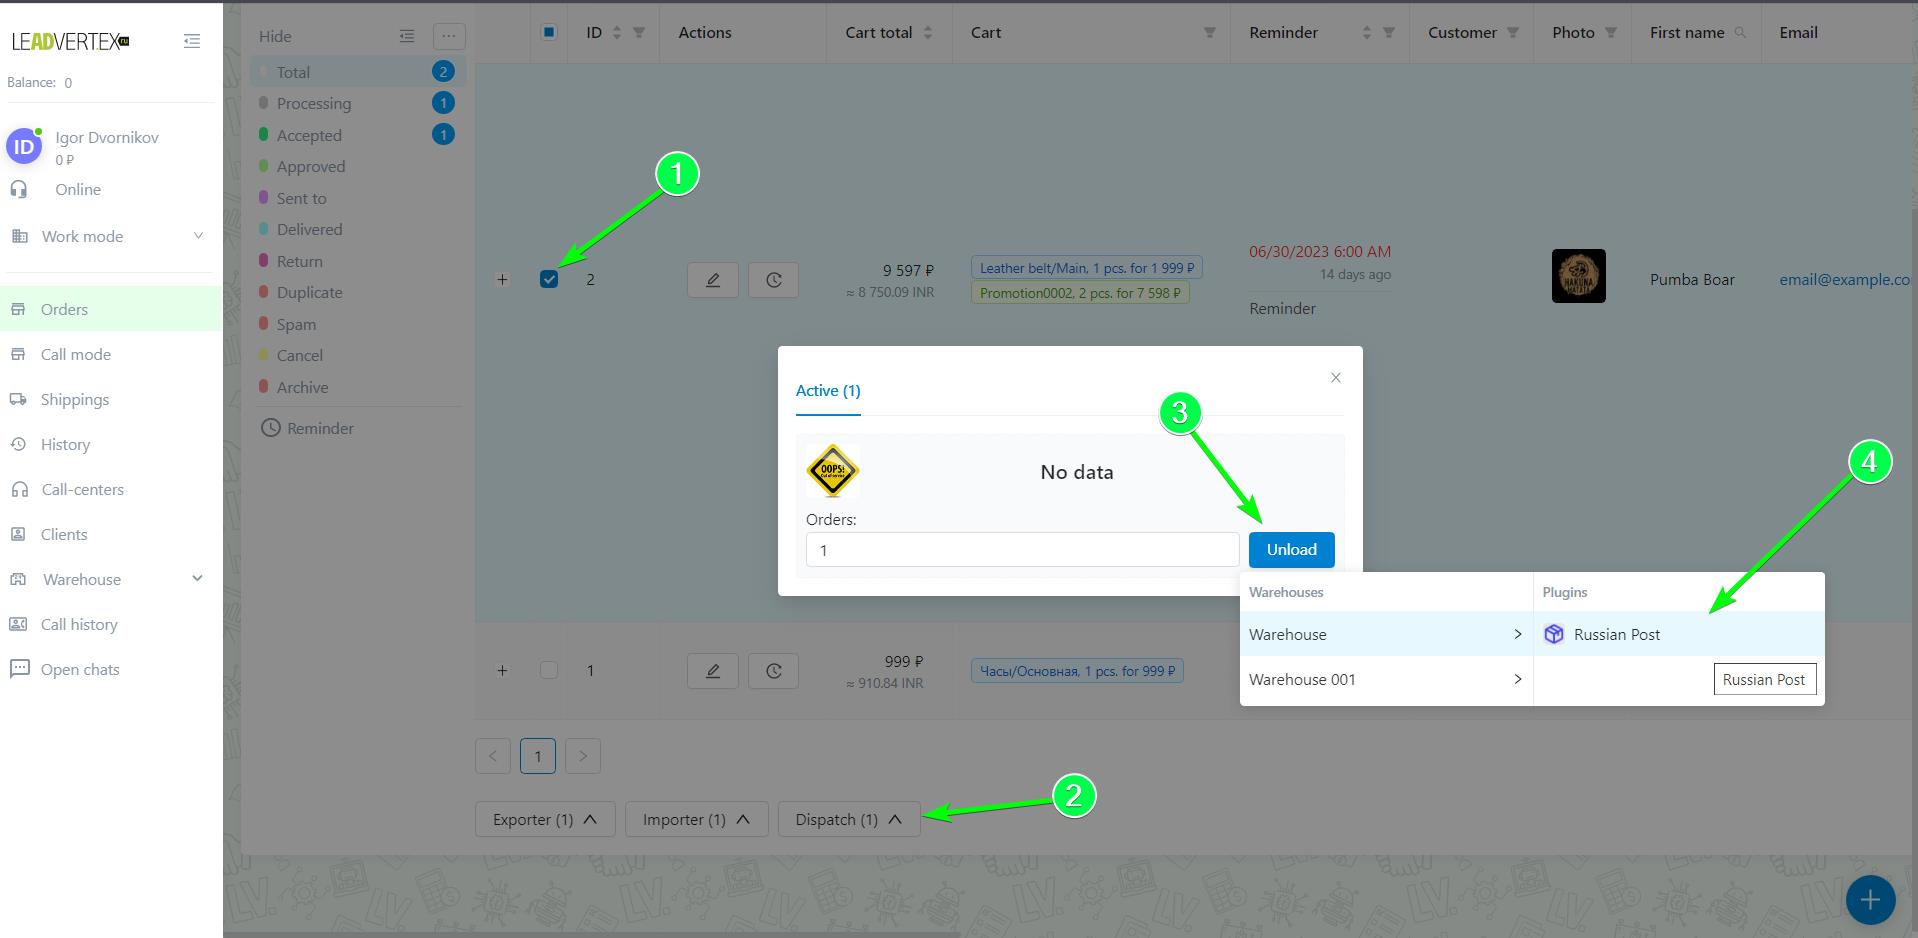
To export you need to go to the Work mode - Orders, select orders you need or do not select if you need to send all orders from the selected statuses. Then click the ”Dispatch" button under the table with orders and select the logistics plugin through which orders should be sent, fill in the fields required for sending and click on the “Upload” button. After that, in the background, orders will be uploaded to the personal account of the courier service. We call the generated uploads “Shippings” and store them in a separate menu.
When the operation is completed, you will see it in the shipping history with the status “Created”. Then open Work mode - Shippings. Here, in the “Shippings” section, shipments are automatically created at the time of unloading orders to the courier service through logistics plugins. It is not possible to create a shipment manually from this section.
{{SCREENSHOT}}
At the screenshot we see 3 shipments. For each shipment, you see the creation date, the unloading warehouse, the courier service plugin, the number of orders, items inside, and its status. Most of the statuses are automatic, they change after some automatic operations with sendings are complete. You don't need to do anything with most of them, but for general understanding, we have described all of these statuses.
- “Created” status is set automatically and means that this shipment is currently being formed (orders are being exported). The process takes 1-2 minutes if there are few orders; and for example, there are 1000 orders to export, the operation will take longer. Therefore, until all orders are exported, the shipment will be in the Created status. You just have to wait
- “Unsuccessful” status is set automatically in cases if the courier service return an error when exporting to your personal account or the logistics plugin stopped working correctly. For example, you have 100 orders, 20 of which were exported, and then the courier service returned an error. In this case, the upload stops completely and gets the status Unsuccessful, so the upload must be done again
- “Sent” status is set automatically after the upload is completed. This status is technical and cannot always be seen, since immediately after receiving this status, the system starts counting the number of items contained in this parcel. If there are a lot of orders and items in shipment, then the calculation may take some time. At the end of the calculation, the status will automatically change to the status "Prepared"
- “Prepared” status is set automatically after the total quantity of items has been calculated. This status means that the shipment has been generated, all necessary operations have been completed. At this point, the submission has two buttons in the Actions column: Send and Cancel Sending. Using the buttons, you can either confirm the write-off stocks from the warehouse, or cancel the shipment and then the balance will not be written off from the warehouse. When using the Send” button, the user needs to select from which consignment of items the balances should be deducted. If you use the Send button, the submit status will change to Sending.
- “Dispatched” status is set at the moment when you confirmed the shipment via the “Send” button and at this moment the system is trying to write off the remaining items from the warehouse. The write-off may also not occur immediately, it may take 5-10 minutes or more, depending on the number of goods. After an attempt to write off balances, the status can take two positions Sent and Need to recheck.
- “Need to recheck” status is displayed if it was not possible to write off the stocks from the warehouse. For example, two employees are editing two different shipments with the same item at once. At the time of editing your employees didn't save their sendings yet, so they see the same number of stocks in consignments and may not know that now another employee will write off stocks and the consignment will decrease by N units. Let's say they save their sendings at the same time or with a small difference. Everything will go well for one employee and the stocks will be written off, while the second will no longer have enough stocks, so his sending will take the status Need to recheck. In this case, the sending will need to be edited. The settings will be saved, but now where there is not enough item leftovers, there will be a red highlight.
- “Sent” status is set if the write-off of stocks from the warehouse was successful. This is the final status of the Sending. But if necessary, sending can be cancelled using the “Cancel sending” button.
- “Cancel” status is set at the moment when the “Cancel sending” button was pressed and the cancellation process starts.
- “Canceled” this is the final status for sending when you cancel sending. It is not possible to restore the shipment. If the shipment was accidently cancelled, then the user needs to re-export orders through the logistics plugin on the "Shippings” page.
¶ “Send” and “Cancel sending” buttons, how to choose items with the closest expiration date
These buttons are not always displayed, they appear only if the status of the submission is “Prepared”, “Need to recheck” and “Sent”
{{SCREENSHOT}}
1. The “Send” button does not send data to the courier service, it is necessary to write off stocks from the warehouse. By clicking on the button, a new window opens with more detailed information about the items and the ability to specify from which consignment of items the balance should be written off.
This is how the menu that opens when you click on the “Send” button looks like:
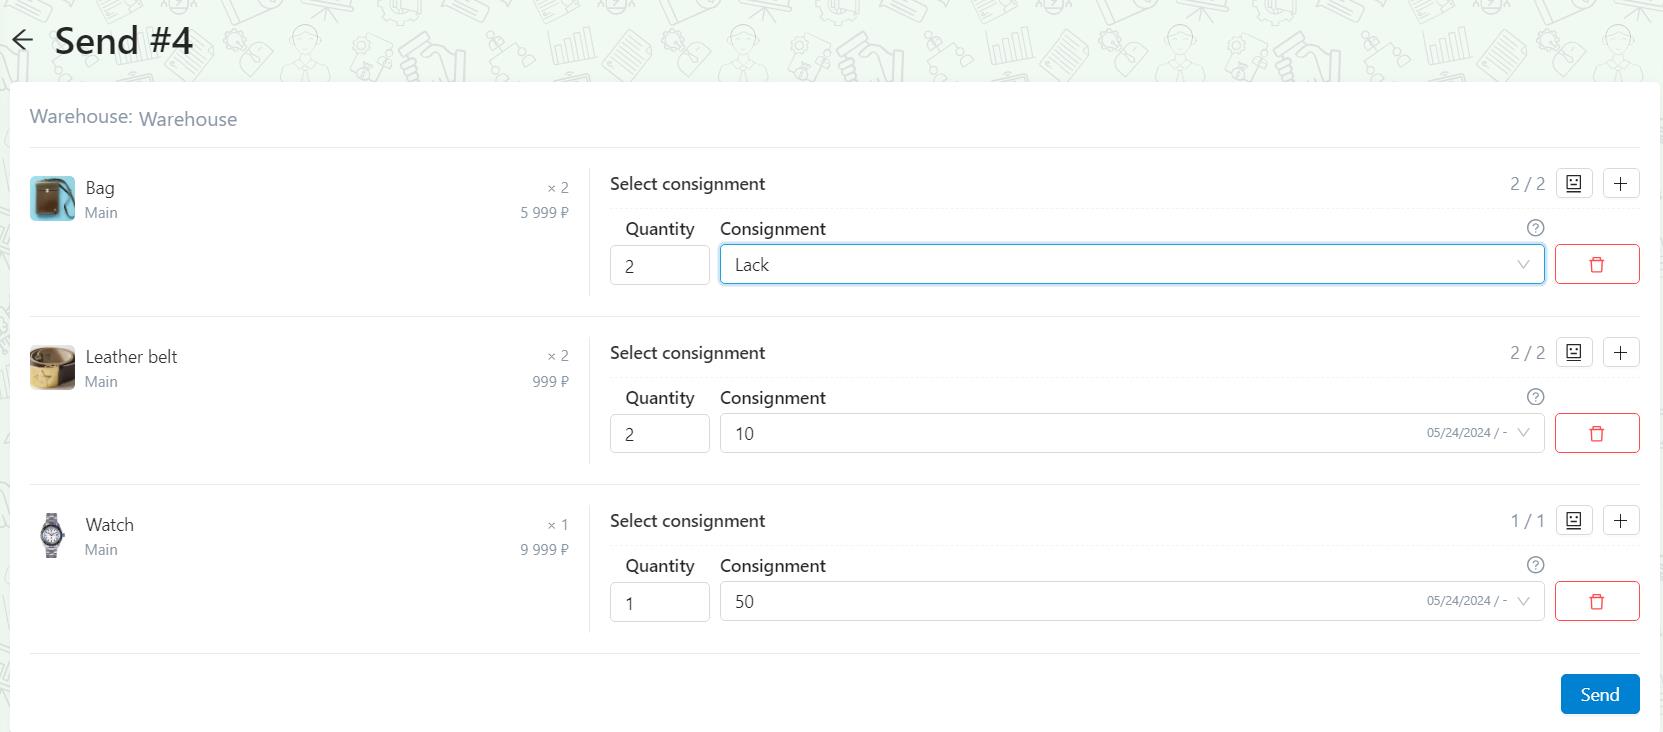
- The Warehouse column shows the name of the warehouse from which stocks will be written off and from which information on current stocks is pulled up. The name of the warehouse is clickable, by clicking it displays information about the warehouse. It will not be possible to change the warehouse, since we are working with an already formed shipment. The warehouse is linked to the logistics plugin.
- Below the warehouse displays a list of items, their quantity and price, which is included to the shipment. It will also not possible to change the quantity, price, product, since this is a ready-made shipment. This information is displayed so that the user understands how much and what kind of items is planned to be sent, and can correctly choose from which consignment of itmes to write off from stocks.
- At the right of the list of items you can see “Select consignment” block. In this block, you can specify how many items and from which consignment of items will be written off. In the consignment tab, we display all receipts of items in warehouse accounting. For example, you sell the product “Glasses” and purchase a new consignment of items from the manufacturer in the amount of 20 pieces. And so that the system “knows” that items quantity increased, we enter into the system information that we add 20 units to the "Glasses" item. You can read more about creating consignments in the corresponding section.
So, in the Quantity field we specify manually the amount that will be deducted from the consignment in “Select consignment” block. We can deduct the entire quantity from one consignment, or we can divide and write off n-quantity from each consignment. Next to the amount in consignment, you can see a list of all consignments and their balance. It is necessary to choose the consignment from which the stock will be written off. In consignments you can find the following information: quantity and unit of measure, date of arrival (adding a consignment) and expiration date (when the expiration date ends).
Usually the oldest item is sold first, and then goes the newer one. Especially if the item has an expiration date. But the previous consignments are less than 9 pieces, and what to do in such a situation? It's simple, we can write off any amount of items from each consignment, so that in the end we get 9 units. Here is an example of setup in which we take the oldest consignments:

It is important that the number of items may be less than in the consignment. But you cannot specify the number of items more than in the consignment.
It is also important that there is a "Lack" option in the consignment selection. It allows to write-off stocks in the negative, when in fact you have items on your warehouse and it can be sent, but there are less items in the warehouse accounting in CRM. This happens very often and is adjusted according to the physical availability of the items on your warehouse . The Lack option can be used in case when we do not have a suitable number of consignments or there are no consignments at all in the list.
We also have an Autofill button that automatically sets the number of items and selects consignments. Autofill works according to the logic - write off the stock from the “oldest” consignment of items.
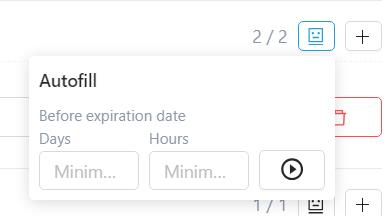
In autofill, it is possible to specify how much is left before the expiration date.
{{SCREENSHOT}}
This is need to exclude consignments that do not match the expiration date from autofill. For example, you know that the item will be delivered in 30 days, and the product expires in 20 days, so there's n o point in sending this item, so it should be excluded.
After we have distributed the number of items to deduct and from which consignment, we can click to the “Send” button and then the status of the shipment will change to Dispatched.
It is important that at the stage of the status Preparation we have a second button “Cancel sending”

If we use the “Cancel sending” button, the status of the shipment will be Cancelled. At the same time, for orders that are included in these shipments, all information will be deleted from the “Shipments” column, and the track number and tracking status will be deleted from the “Logistics” column.
¶ Logistics statuses (tracking)
Logistics status - is an order delivery status of delivery services like ShipRocket, Ecom Express, Russian Post, etc. Logistics statuses are not the same as shipment statuses, by which we considering entire shipment, for example, 100 orders for Russian Post.
Our system has its own logistics statuses, which help to track orders from different postal and courier services to one universal tracking. However, we still receive original statuses from courier services to make it easier for you to work with orders.
Here's the list of logistics statuses:
Not registered - the shipment is lost or destroyed (when return to the sender is not required)
Created - the invoice required to register the shipment with the courier service has been created.
Registered - the shipment is registered in the courier service system. The status means that the shipment has been registered via the API and all the shipment data has been transmitted.
Accepted - the shipment has been accepted in the courier service system. Status means that the shipment (cargo) has actually been transferred to the courier service for dispatch.
Packed - the item is packaged for shipment. The status applies if the courier service provides packaging/stickering services for shipments.
Shipping - the shipment has left the receiving location. The status means that the courier service has transferred the shipment to its destination.
Arrived - the shipment has arrived to the destination. Status means arrival at the post office/issue point
On delivery - the item is handed over to the courier for delivery. This status is usually assigned to courier delivery. It should not be assigned if issued at a post office/pickup point.
In storage - status means that the shipment has either returned from an unsuccessful delivery from the courier, or is in storage awaiting the recipient at the destination. This status differs from the "Arrived" status in that it often indicates storage after unsuccessful attempts.
Delivered - status means delivery to the recipient.
Paid - status means the fact of payment of cash on delivery. However, this status is usually assigned at the time of transfer of funds from the courier service to the sender's account, and not at the time of actual payment by the client.
Return - the shipment is returned due to the impossibility of delivery, for reasons of refusal to receive, absence of the addressee and other reasons that the courier service can convey in addition to the status.
Return to sender - the shipment has received the return status and is on its way back to the sender.
Delivered to sender - the item has been returned to the sender.